Friday, June 22, 2012

Summer Spruce Up

So I have been collecting a few things throughout the years that I have sworn I would re-finish or up-cycle to decorate my outdoors with. For the last 6 years, a corner in my garage has been the home to some old windows, an old door and a few older chairs. Other spots in the house have housed some wrought iron, magnet boards, and other odds and ends. It seems though that other things seem to get in the way. It does for everybody. So we deal with it knowing it will happen when it happens.

Well, it has finally happened. The time has come and these things have been re-vamped!!! Can I get a WOOT WOOT??
Here some of the things we are working with here:


An old magnet board. In my old house in Bountiful, I used this in my kitchen. The house I am in now has a different setup, so it has been sitting for 3 years. So sad, I know. I have this crazy idea to hang it by my front door.I could put a cute little magnetic paper pad and a pencil cup for messages and different seasons of magnets. I think I can pull it off. We'll see.


Old Window, and a 10 window pane door. 
I know people spend hundred of dollars on doors like these. I feel a little guilty saying I got this one for free. I did spend money though when I bought one for my husbands PT clinic. Actually I talked the lady down from $120 to $65 for paying cash. These objects have real potential.


Left over furniture legs. (I know you are wondering what these have to do with summer decor) I have a friend that works for a furniture company. They have these legs leftover by the box full. In fact, he was using them as firewood! Gasp! I am thinking rustic candle holders??

 I have a few other things that I am going to add to this porch decor but I don't feel any desire to take pictures of a red area rug, grapevine or an old birdcage I have already redone.Sorry, I redid the birdcage before I ever thought about blogging.

Imagine if you will the structure of my front porch: you walk out the front door, walk about 4 feet and turn to your right and there is another area. It is an L shape. I have steps coming up to the porch from the walkway. I have always felt that when a visitor approaches that top step, they should see an extension of what is inside my home. I want people to feel a little bit of a hug as they go to ring my doorbell.

So I laid out the area rug by the front door. I hoped it welcomed people and made it feel like an outdoor living area. I didn't do any work to the magnet board, I just wiped it down, and hung it up. I bought the plant stand from home depot, and potted some impatiens flowers in white coral and red. I had this wreath stand and the wreath forever- don't knock it! It is rough I know....


This was last years project (before I was encouraged to blog). I spray painted these chairs brown. They were originally white. I bought the cushions and throw pillows on sale about halfway through the summer. I will replace them someday, but not now... it isn't in the budget. :)


Here is the door painted. Red is my signature color. I love red. It is strong, vibrant and regal. So why not refinish the door in this color? Okay, this door needed a lot of work. Sanding priming and painting. I replaced the doorknob hardware, you will be able to see that in a minute.


I know you were wondering how I was going to turn furniture legs into candle sticks but here it is. You take these furniture pieces and match up the circumference of one piece to the next. Put as many together as you see fit and voila! you have candlesticks. I will post a detailed tutorial soon.(Don't criticize my ghetto decor.... you love it!)

If you look really closely you will see that absolutely nothing on this window has been done. I have sanded or painted or anything. I just don't want it to sit in my garage any longer being "out of sight, out of mind", So I hung it up, and moved my wreath from the front door to here. I will get to it a lot sooner this way.


Here is my bird cage planter. It is an old cast iron bird cage I bought online a while ago for my parakeets. It was way too big for them. So I opted to use it for decor. It sits in the corner of the porch by one of the chairs, in front of the door.


And this picture is from standing right at the top step of the porch, to my right is the front door.


If you look at these 2 pics it is almost like you are looking around the corners to my porch!

So as soon as I update the magnet board I will post about that and I will have a tutorial to come on the candle sticks.

Leave comments with your blog name, I  would love to see what you have done with your space!

Wednesday, June 20, 2012

Can Money Buy Happiness?

Uhh, yeah! It totally can. For me at least. Okay, totally kidding. But in this really small realm it totally did. My happiness came at the bargain price of $1.97. If you shop there regularly, you know this is a Wal-Mart price!

For Mother's Day I received a gift card to Tai Pain  Pan. (hee hee hee... I have a love/hate relationship with that store!)  I bought a few things with it, including a wreath. This wreath is awesome. It is this beached out wood woven together in a pattern, and it is solid, so it will hold up fora long while. I have my coatcloset by my front door that has been in need of something desperately for a while now -and when I saw said wreath, I knew this piece was it!
Enter new dilemma....

I have a kagillion rolls of ribbon and ribbon scraps, but nothing really said "wow" to me. And if you are owner of lots of ribbon, you know you are pretty well stocked for any craft at a moments notice. And if you don't have what you need, it is frustrating.
And then there was my latest trip to Wal-Mart...

Walmart has, at most, a basic selection of ribbon and crafting supplies.So I rarely depend on finding what I am looking for there. But every once and while for kicks and giggles, I will see what they have. Apparently my Walmart is undergoing a major over haul in this department because I must say I was impressed. Their ribbon selection has gone from one quarter of a section of shelving to about one third of a section, AND their flowers are now in those little glass vases instead of all shoved into a wall :) I know, right?

I found a red a cream two and a half inch ribbon in a Damask pattern. It also comes in black and white. I was sooo excited because it had the wow factor.
See???....

Okay, so maybe you aren't that impressed, but since red is my accent color, it is really nice to find something that matched and wasn't a solid red either.
And, for $1.97 I was able to buy enough ribbon to double up so the back of the ribbon was the same as the front when it hangs on the hook, like so:


AND... I had leftovers to wrap my candles. (You know, the ones your kids pick up, and they also have a few teeth marks too?) And since red is also an accent color for my front room, it matches perfectly as well. 
Have you ever used ribbon to decorate with before and it ends up getting all frayed and gross? Well, here is a little trick.


I use a lighter (fire) on the edge of the ribbon to micro melt the edge. Then it doesn't fray. Be careful though, it can shape the edge irregularly.


Then I wrapped it around the candle and put a pin there. I push the pin into the wax so that nobody gets pricked. Besides, on my candles it wouldn't make a bit of difference.


TA DAHHH!!! I love it. I think it adds a lot!

So, what can a $1.97 do for you?

Tuesday, June 19, 2012

Pantry Makeover Part 2


Wow, things have been cray-zee! Between the kids, the blog and the projects, I can't seem to find a great balance!! I have been really busy with a lot of different things, so at least there will be some great posting ahead. (Not to spoil the surprise but I am talking about kitchen back splashes, pallet furniture, outdoor decor and power tools. :))

In all of this, I have managed to get my pantry put together. I am a little nervous for the reveal. Have you ever done a project and you like it about 98% but you aren't sure if you LOVE it? I am there right now, but I don't know what about the whole thing that I would or even want to change...
Weird, right? 
Here it goes.....

Ta Dahhh!
Love it or hate it, here it is.  

I painted the pantry  the Dorset Gold from Benjamin Moore. The cream color was a mis-tint from Home Depot. 


I did also paint the shelves, but put down contact paper to protect the shelves. It also made the jars and things slide around better. I chose a contact paper from Target that they now carry in stock :) At least at my Target they do.


The pattern on the wall behind the jars is one I designed on my Silhouette. I was inspied the House of Smiths blog, and you will find the link below.

The jars I used for my flour and sugar I purchased from WalMart. They are a 2 gallon capacity. They actually hold quite a bit. I can fit 10 lbs of either flour or sugar with a lot of room to spare. It is nice to have a container that I can make a batch of bread or rolls without depleting the contents in the jar!


These plastic canisters I also bought from WalMart. They have a one gallon capacity and they sell for $3 each. WalMart also sells smaller ones that are a 1/2 gallon capacity. They have been so handy to store a lot of my bulk foods in. Remember, I have a large family....


So, like I said in a previous post, my Silhouette has become a label maker as well. And it has been really fun, and OCDish. I have really enjoyed adding this sense of order to my pantry. At the same time I haven't made all these poor little containers conform, they have some individuality :) If you look you can see they're not all the same


As I said in Part 1, I copied this little create idea from House of Smiths and her pantry makeover.


I didn't find much at the DI by way of containers and such for my pantry. I found 4 things after going to 2 seperate DI's. I will continue to look until I find exactly what I need but here is what I found so far: a basket, 2 jars, and a tin. I am going to strip the tin down so it is just a metal color.

My pantry isn't complete completely done though. I have run out of vinyl twice and when I go to get more, they are out. I will continue to chip away at it until it is done  :)


Monday, June 18, 2012

Everyday Life

There a are a few contributing factors that add to the irritation in this post.
First: It's Monday
Second: It's Monday AFTER a holiday
Third: I tweaked my back!

Having been injured before, I think what worse than sitting around waiting to get better is the fact you can't get anything done. You have the full capability of your mind to sit around and think about what needs to be done, and what you could be doing, and nothing to show for it at the end of the day. :)
Don't getme wrong, I love reruns of CSI, and Law & Order, even World's Wildest Police Videos, but after so long you just want something done. 

Saturday I went to workout as normal, and have no idea what happened, but my back was left all tight. For the rest of the day I was walking very slowly,and tenderly. We spent all day Saturday finsihing up some loose end decorating. Actually my husband finished up this stuff while I sat and told him what to do.

Because Todd is so awesome, he spent the day helping me and absolutely nothing got done around the house! So here is what this morning brought me.
Kitchen

Dusty Living Room

Girls Room

Master Bath

Master Bed

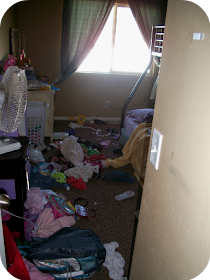
I took these photos this morning, and it would be really awesome if I could post additional photos that show things differently...... but it is actually worse. Remember.... its summer     and all the kids are out of school.... and I have 6 of them.... that think they don't have to help unless I am standing right there.:) Sound familiar to anyone else?

Life is good though. I actually sound crazy when I say I am thankful for days like these. It reminds me of how great my regular everyday life is. :)

Tuesday, June 5, 2012

Laundry Room Makeover Part 3


Holy crap! Has it taken long enough?!? What is it about any type of home project that takes 4 times as long as it should and cost 3 times more than you budgeted? I have a feeling you might hear me say that again in the future...
Anyhoo... I have refrained from posting because I think having a 4 part segment for a LAUNDRY ROOM is excessive but seriously, I have one aspect of it that is not done and is still going to take more time. But I will get to that soon enough.
I posted before, the pics of the new paint, wallpaper, border, and inside of the cabinets. In case you missed them, click here for Part 2. In the reveal below, you will see some vinyl that I created through the silhouette software. For the first 10 people to leave a comment below me for each design in THIS post I will send you my Studio File. Here's what you do.... Leave me a comment, and then email me with the design you want.

Okay here is the reveal of the new space...


Starting from the door, on the counter I have a cute green flowering can (Tai Pan) I got on clearance, and some orange daisies. I also made this framed picture with patterned paper and vinyl. It was the WORST thing I have ever had to pick and I would never do it again. But the clothespins are fun. I designed them and I might add a few to my wall.


Next to it is one of my faves- This little plank of wood with a Subway art type thing. I had an old piece of decor that I couldn't use anymore so I up cycled it by sanding it down and painting it. I also designed the vinyl that I laid on this board. It measures 16 3/4 " by 4 1/2".


I put this little shelf on the wall behind my dryer. I put it there to protect things from falling behind the dryer. So of course we can't just put up a shelf, we have to add a little pizazz. So, cue the vinyl. I created a little pattern to put on top of the shelf and draw the eye toward it.
I also created this little box. Pockets are a big deal in my house. I HAVE to check them... because no else does! And I need a place to put all of the treasures I find.


I saw this cute wall design on Pinterest. I clicked to follow the link and it went to an Etsy shop, but was no longer there for me to give credit to. So I created my own on my Silhouette.

I think anyone who has children, might need a missing sock board. After folding laundry I swear I almost have a half basket left that are just socks! There are lot of designs to choose from, but I like this phrase the best.

If you continue left around the room counter clockwise, I put up a bigger shelf.


If you live in UT, there is this awesome little home decor store in Holladay. It is called Real Deals. Their stuff is soooo cute ,and if you catch it on sale it is even better! I got the shelf for $20 on sale, and those little "bars"of soap were 99 cents  regular price! The 2 pitcher I got at Tai Pan.

And now for the Piaz de Resistance (yeah, I have no idea how that is supposed to be spelled......)

An OFFICIAL location for the lint roller. I am so excited about this! Since I have been working on the pantry, I keep putting it in the laundry room, yet it keeps ending up in the pantry? I. Don't. Understand...
I am going to Target tonight to get a command hook for this space.
As for the contact paper on the shelves... I found a better pattern that I think blends better with the space, that is also at Target.
And.... you probably wonder where I put my laundry baskets? Well, this is the part that I am almost done with and is going to turn this into a 3 part segment. I have drafted up plans for a 4 bin laundry hamper! It is almost done, and then needs to be primed and painted. It measures 36" tall, by 61" wide, and then 12" deep. It is going to fit perfectly on the wall with the bigger shelf. I am sewing laundry bags to hang inside as well. So, hopefully I won't go this long before posting again!