I am so excited to say my archway is not dreaded anymore! Yay for me! It has been a long time coming, and with a great deal of thought too. If you didn't see the post on how it was the The Dreaded Archway, click here. I had knee surgery in March and was on crutches for 4 weeks. I spent A LOT of time on my bed, looking out through my doorway into the archway, and I think my decision was pretty thought out. Drum roll please.......

Showing posts with label Home Improvement. Show all posts
Showing posts with label Home Improvement. Show all posts
Tuesday, July 23, 2013
Friday, February 8, 2013
Tackling the Master Closet
We all have those problem areas. (No, I am not talking about our bodies!) I am talking about those areas in a home that might be considered "common areas" which you have to share a space with someone. Oh sure we try our dangdest to make it work. You shuffle and move things around to always come back to it and realize it is not working for you. In my case, I have to share a space with a man that knows nothing of real organization. He is of the school of thought that if it is out of sight, it is organized. I am serious! He cracks me up the way things are for him. My idea of "organized" is a functional plan that can be executed. It will be great if I can make it look good, but if it doesn't work for day to day and cannot be carried out regularly, it doesn't matter what it looks like.
Welcome to my master closet. Hmmm, what do we have in here? Because it is not just our clothes and shoes and stuff. If you are a parent then you know that your space is NEVER your own. You "share" it with all the little people AND their toys. Even right after you clean it, the little people come in gawking at all the open space and bring their toys in to have a tea party!!!
I need some major help in this area. I was so spoiled with our house in South Carolina. We had his and her closets.... with space to put all your stuff....you didn't have to wrestle the hangers to slide them to hang a shirt up....there were shelves for everything..... And then SNAP!!! We have our Master closet here. It has space, but no function! I am convinced that homes are designed by single hermit men that think of the most ridiculous use of a space AND ADD IT TO THE FLOOR PLAN. Yes, I am frustrated if you cannot tell.
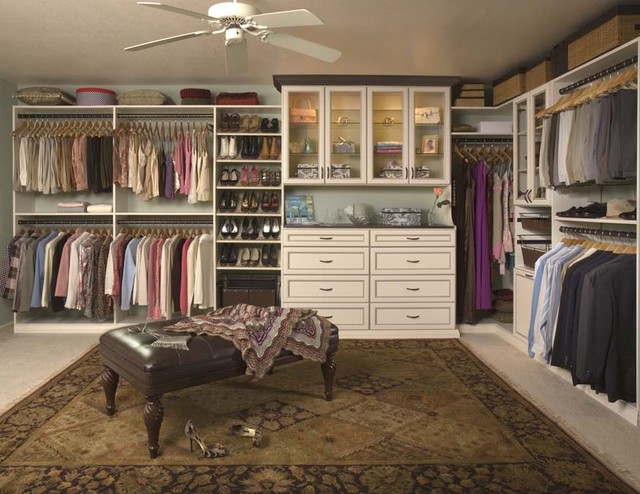
So to find some inspiration.... I Pinterest, Google, and Bing it! "Crrcchht, Could we have a dose of logic delivered to the internet please? Over, crrcchht". Are. You. Kidding. Me. These are layouts/ideas for closets the size of my FAMILY ROOM! This is not real life (at least not my real life). I am not spending $1000's on a new system here. (I just want to find the drawer my red pumps are in?!?)


Yeah. Uhhh, none of these (as beautiful as they are) will work for me. This is the space I am working with here:
It's sad, on a good day. Yes!!! Those are boxes from DVD players, and cases for Nintendo DS games! Why are they in my closet?!? No idea! I have got to get this space working. So, off to the drawing board... or at least the Sketch Book- to take measurements and see if I can come up with an execute-able system.This is what I have to think about:
Welcome to my master closet. Hmmm, what do we have in here? Because it is not just our clothes and shoes and stuff. If you are a parent then you know that your space is NEVER your own. You "share" it with all the little people AND their toys. Even right after you clean it, the little people come in gawking at all the open space and bring their toys in to have a tea party!!!
I need some major help in this area. I was so spoiled with our house in South Carolina. We had his and her closets.... with space to put all your stuff....you didn't have to wrestle the hangers to slide them to hang a shirt up....there were shelves for everything..... And then SNAP!!! We have our Master closet here. It has space, but no function! I am convinced that homes are designed by single hermit men that think of the most ridiculous use of a space AND ADD IT TO THE FLOOR PLAN. Yes, I am frustrated if you cannot tell.
So to find some inspiration.... I Pinterest, Google, and Bing it! "Crrcchht, Could we have a dose of logic delivered to the internet please? Over, crrcchht". Are. You. Kidding. Me. These are layouts/ideas for closets the size of my FAMILY ROOM! This is not real life (at least not my real life). I am not spending $1000's on a new system here. (I just want to find the drawer my red pumps are in?!?)

Yeah. Uhhh, none of these (as beautiful as they are) will work for me. This is the space I am working with here:
 |
| Standing in the doorway |
 |
| HIS.... |
 |
| HERS... |
 |
| I have been using these clear tackle boxes for jewelry, but I would like it out and displayed for easier access |
 |
| This is the catch all for any jewelry, whether it is mine or not. THAT has to be detangled.... |
- We Are Tall Peeps: I come in at 5'11" and my husband is 6'6". Therefore the space at the top of the closet it usable space for us.
- This also means our clothes might be longer so I might need to adjust the height of the bars.
- Storage Space Is Mandatory: For women, a lot of things we own are not always seasonal. I have purses, shoes, scarves, and jewelry that I use year round. So I need to think of a way to store these things that don't take a lot of space.
- If It Looks Pretty Than I want It To Stay Pretty: This concept applies to all of us. When a space looks nice and is inviting, we tend to want to keep it that way rather than ignoring it. If I can design something where I might be able to add some decorative wall/contact paper to make the closet be an extension of our room, it will help me want to keep things organized.
Okay, I am off to see how I might be able to pull this project together before Spring gets here!
Friday, June 22, 2012
Summer Spruce Up

Well, it has finally happened. The time has come and these things have been re-vamped!!! Can I get a WOOT WOOT??
Here some of the things we are working with here:

An old magnet board. In my old house in Bountiful, I used this in my kitchen. The house I am in now has a different setup, so it has been sitting for 3 years. So sad, I know. I have this crazy idea to hang it by my front door.I could put a cute little magnetic paper pad and a pencil cup for messages and different seasons of magnets. I think I can pull it off. We'll see.

Old Window, and a 10 window pane door.
I know people spend hundred of dollars on doors like these. I feel a little guilty saying I got this one for free. I did spend money though when I bought one for my husbands PT clinic. Actually I talked the lady down from $120 to $65 for paying cash. These objects have real potential.

Left over furniture legs. (I know you are wondering what these have to do with summer decor) I have a friend that works for a furniture company. They have these legs leftover by the box full. In fact, he was using them as firewood! Gasp! I am thinking rustic candle holders??
I have a few other things that I am going to add to this porch decor but I don't feel any desire to take pictures of a red area rug, grapevine or an old birdcage I have already redone.Sorry, I redid the birdcage before I ever thought about blogging.
Imagine if you will the structure of my front porch: you walk out the front door, walk about 4 feet and turn to your right and there is another area. It is an L shape. I have steps coming up to the porch from the walkway. I have always felt that when a visitor approaches that top step, they should see an extension of what is inside my home. I want people to feel a little bit of a hug as they go to ring my doorbell.

So I laid out the area rug by the front door. I hoped it welcomed people and made it feel like an outdoor living area. I didn't do any work to the magnet board, I just wiped it down, and hung it up. I bought the plant stand from home depot, and potted some impatiens flowers in white coral and red. I had this wreath stand and the wreath forever- don't knock it! It is rough I know....

This was last years project (before I was encouraged to blog). I spray painted these chairs brown. They were originally white. I bought the cushions and throw pillows on sale about halfway through the summer. I will replace them someday, but not now... it isn't in the budget. :)

Here is the door painted. Red is my signature color. I love red. It is strong, vibrant and regal. So why not refinish the door in this color? Okay, this door needed a lot of work. Sanding priming and painting. I replaced the doorknob hardware, you will be able to see that in a minute.

I know you were wondering how I was going to turn furniture legs into candle sticks but here it is. You take these furniture pieces and match up the circumference of one piece to the next. Put as many together as you see fit and voila! you have candlesticks. I will post a detailed tutorial soon.(Don't criticize my ghetto decor.... you love it!)

If you look really closely you will see that absolutely nothing on this window has been done. I have sanded or painted or anything. I just don't want it to sit in my garage any longer being "out of sight, out of mind", So I hung it up, and moved my wreath from the front door to here. I will get to it a lot sooner this way.

Here is my bird cage planter. It is an old cast iron bird cage I bought online a while ago for my parakeets. It was way too big for them. So I opted to use it for decor. It sits in the corner of the porch by one of the chairs, in front of the door.

And this picture is from standing right at the top step of the porch, to my right is the front door.
If you look at these 2 pics it is almost like you are looking around the corners to my porch!
So as soon as I update the magnet board I will post about that and I will have a tutorial to come on the candle sticks.
Leave comments with your blog name, I would love to see what you have done with your space!

Tuesday, June 19, 2012
Pantry Makeover Part 2

Wow, things have been cray-zee! Between the kids, the blog and the projects, I can't seem to find a great balance!! I have been really busy with a lot of different things, so at least there will be some great posting ahead. (Not to spoil the surprise but I am talking about kitchen back splashes, pallet furniture, outdoor decor and power tools. :))
In all of this, I have managed to get my pantry put together. I am a little nervous for the reveal. Have you ever done a project and you like it about 98% but you aren't sure if you LOVE it? I am there right now, but I don't know what about the whole thing that I would or even want to change...
Weird, right?
Here it goes.....

Ta Dahhh!
Love it or hate it, here it is.
I painted the pantry the Dorset Gold from Benjamin Moore. The cream color was a mis-tint from Home Depot.

I did also paint the shelves, but put down contact paper to protect the shelves. It also made the jars and things slide around better. I chose a contact paper from Target that they now carry in stock :) At least at my Target they do.

The pattern on the wall behind the jars is one I designed on my Silhouette. I was inspied the House of Smiths blog, and you will find the link below.
The jars I used for my flour and sugar I purchased from WalMart. They are a 2 gallon capacity. They actually hold quite a bit. I can fit 10 lbs of either flour or sugar with a lot of room to spare. It is nice to have a container that I can make a batch of bread or rolls without depleting the contents in the jar!

These plastic canisters I also bought from WalMart. They have a one gallon capacity and they sell for $3 each. WalMart also sells smaller ones that are a 1/2 gallon capacity. They have been so handy to store a lot of my bulk foods in. Remember, I have a large family....

So, like I said in a previous post, my Silhouette has become a label maker as well. And it has been really fun, and OCDish. I have really enjoyed adding this sense of order to my pantry. At the same time I haven't made all these poor little containers conform, they have some individuality :) If you look you can see they're not all the same


As I said in Part 1, I copied this little create idea from House of Smiths and her pantry makeover.

I didn't find much at the DI by way of containers and such for my pantry. I found 4 things after going to 2 seperate DI's. I will continue to look until I find exactly what I need but here is what I found so far: a basket, 2 jars, and a tin. I am going to strip the tin down so it is just a metal color.
My pantry isn't complete completely done though. I have run out of vinyl twice and when I go to get more, they are out. I will continue to chip away at it until it is done :)
Tuesday, June 5, 2012
Laundry Room Makeover Part 3

Holy crap! Has it taken long enough?!? What is it about any type of home project that takes 4 times as long as it should and cost 3 times more than you budgeted? I have a feeling you might hear me say that again in the future...
Anyhoo... I have refrained from posting because I think having a 4 part segment for a LAUNDRY ROOM is excessive but seriously, I have one aspect of it that is not done and is still going to take more time. But I will get to that soon enough.
I posted before, the pics of the new paint, wallpaper, border, and inside of the cabinets. In case you missed them, click here for Part 2. In the reveal below, you will see some vinyl that I created through the silhouette software. For the first 10 people to leave a comment below me for each design in THIS post I will send you my Studio File. Here's what you do.... Leave me a comment, and then email me with the design you want.
Okay here is the reveal of the new space...


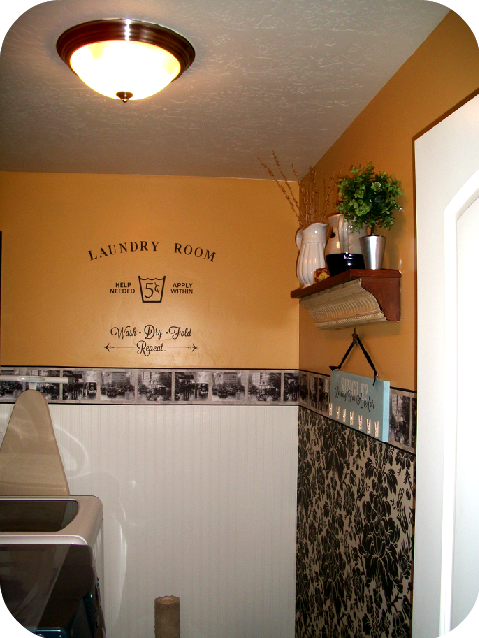
Starting from the door, on the counter I have a cute green flowering can (Tai Pan) I got on clearance, and some orange daisies. I also made this framed picture with patterned paper and vinyl. It was the WORST thing I have ever had to pick and I would never do it again. But the clothespins are fun. I designed them and I might add a few to my wall.
Next to it is one of my faves- This little plank of wood with a Subway art type thing. I had an old piece of decor that I couldn't use anymore so I up cycled it by sanding it down and painting it. I also designed the vinyl that I laid on this board. It measures 16 3/4 " by 4 1/2".


I put this little shelf on the wall behind my dryer. I put it there to protect things from falling behind the dryer. So of course we can't just put up a shelf, we have to add a little pizazz. So, cue the vinyl. I created a little pattern to put on top of the shelf and draw the eye toward it.
I also created this little box. Pockets are a big deal in my house. I HAVE to check them... because no else does! And I need a place to put all of the treasures I find.

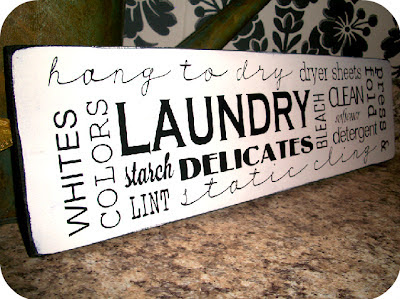
I saw this cute wall design on Pinterest. I clicked to follow the link and it went to an Etsy shop, but was no longer there for me to give credit to. So I created my own on my Silhouette.

I think anyone who has children, might need a missing sock board. After folding laundry I swear I almost have a half basket left that are just socks! There are lot of designs to choose from, but I like this phrase the best.

And now for the Piaz de Resistance (yeah, I have no idea how that is supposed to be spelled......)

An OFFICIAL location for the lint roller. I am so excited about this! Since I have been working on the pantry, I keep putting it in the laundry room, yet it keeps ending up in the pantry? I. Don't. Understand...
I am going to Target tonight to get a command hook for this space.
As for the contact paper on the shelves... I found a better pattern that I think blends better with the space, that is also at Target.
And.... you probably wonder where I put my laundry baskets? Well, this is the part that I am almost done with and is going to turn this into a 3 part segment. I have drafted up plans for a 4 bin laundry hamper! It is almost done, and then needs to be primed and painted. It measures 36" tall, by 61" wide, and then 12" deep. It is going to fit perfectly on the wall with the bigger shelf. I am sewing laundry bags to hang inside as well. So, hopefully I won't go this long before posting again!
Tuesday, May 15, 2012
Pantry Makeover

Let's face it... the kitchen is the central hub of the home. As the kitchen goes, so does the rest the home. When my kitchen is messy, I feel really overwhelmed. The pantry is a major extension of the kitchen. The family is in and out of it CONSTANTLY!! I have six kids and if they can't find some thing...enter my overwhelming feelings. I hear "Mmmaaawhhhm!....where is the (enter food item here)" Then I have to stop what I am doing and go help.
Things you will literally hear me say are:
" If it was a snake, it would have bitten you..."
"If I find it, you owe me a dollar..."
and my personal fave:
"If I find it, can I hit you with it?" To which they start frantically looking again.... and I start belly laughing cause I am joking. And they tell me that it wasn't funny at all. But it is really.
What is my point?.... It is that my pantry needs to be organized. And not temporarily. I need a system that will be in place for a long time and can be kept up with minimal ease. To coin a phrase... it has to be something a child can do...

Remember this picture?
Absolutely horrid!
Luckily, Pinterest has become a valuable asset these days. I searched for ideas and concepts that would work for me, and our family, but also things that would reflect my personality. The pantry I loved the most I saw at The House of Smith's blog. She has my style and taste nailed. So, if imitation is the sincerest form of flattery, Shelley should be flattered!
I love organization, but most searches pull up pictures of cans and boxes stacked perfectly.To me that is chaos waiting to happen! I wanted ideas that helped eliminated chaos. I also love pretty things. Tags and labels that are personal. So why not combine the 2 and get a Pretty, Organized Pantry?
 |
| House of Smith's Pantry |
This pic is from House of Smiths. My pantry is much smaller than hers so I have to pick and choose what I will use for my space. The ideas that I have taken from House of Smith's blog are the crate, the pattern on the walls, and her recommendation to check the DI for random containers.

So, to match my kitchen I am going to go with the Dorset Gold from Benjamin Moore. The shelves and cleating will be a creme color.
As for the quarterfoil design overlaying the paint, I own a Silhouette so I am creating my own. But you can buy hers from her shop here.


I have my game plan, now to execute it. Pictures to come soon!
Subscribe to:
Posts (Atom)