Image Map

Friday, February 8, 2013

Tackling the Master Closet

We all have those problem areas. (No, I am not talking about our bodies!) I am talking about those areas in a home that might be considered "common areas" which you have to share a space with someone. Oh sure we try our dangdest to make it work. You shuffle and move things around to always come back to it and realize it is not working for you. In my case, I have to share a space with a man that knows nothing of real organization. He is of the school of thought that if it is out of sight, it is organized. I am serious! He cracks me up the way things are for him. My idea of "organized" is a functional plan that can be executed. It will be great if I can make it look good, but if it doesn't work for day to day and cannot be carried out regularly, it doesn't matter what it looks like.

Welcome to my master closet. Hmmm, what do we have in here? Because it is not just our clothes and shoes and stuff. If you are a parent then you know that your space is NEVER your own. You "share" it with all the little people AND their toys. Even right after you clean it, the little people come in gawking at all the open space and bring their toys in to have a tea party!!!

I need some major help in this area. I was so spoiled with our house in South Carolina. We had his and her closets.... with space to put all your stuff....you didn't have to wrestle the hangers to slide them to hang a shirt up....there were shelves for everything..... And then SNAP!!! We have our Master closet here. It has space, but no function! I am convinced that homes are designed by single hermit men that think of the most ridiculous use of a space AND ADD IT TO THE FLOOR PLAN. Yes, I am frustrated if you cannot tell.

So to find some inspiration.... I Pinterest, Google, and Bing it! "Crrcchht, Could we have a dose of logic delivered to the internet please? Over, crrcchht". Are. You. Kidding. Me. These are layouts/ideas for closets the size of my FAMILY ROOM! This is not real life (at least not my real life). I am not spending $1000's on a new system here. (I just want to find the drawer my red pumps are in?!?)


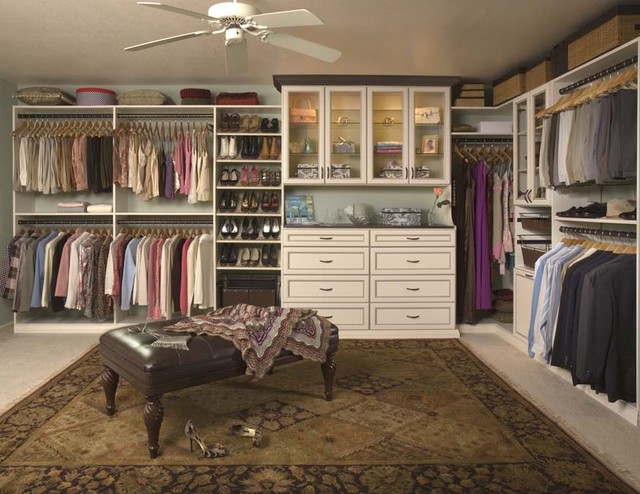
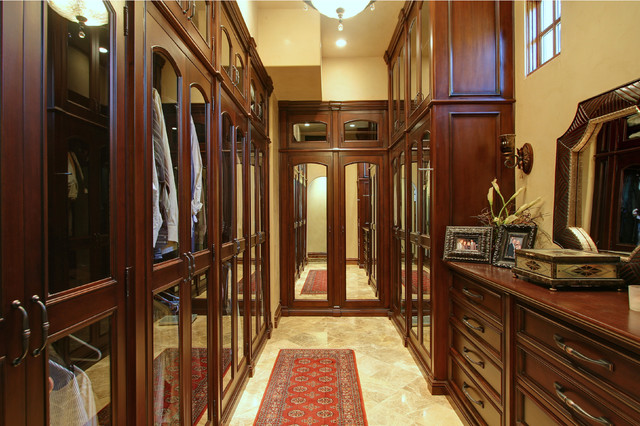
Yeah. Uhhh, none of these (as beautiful as they are) will work for me. This is the space I am working with here:
Standing in the doorway
HIS....
HERS...
I have been using these clear tackle boxes for jewelry, but I would like it out and displayed for easier access
This is the catch all for any jewelry, whether it is mine or not. THAT has to be detangled....
 It's sad, on a good day. Yes!!! Those are boxes from DVD players, and cases for Nintendo DS games! Why are they in my closet?!? No idea! I have got to get this space working. So, off to the drawing board... or at least the Sketch Book- to take measurements and see if I can come up with an execute-able system.This is what I have to think about:
  • We Are Tall Peeps: I come in at 5'11" and my husband is 6'6". Therefore the space at the top of the closet it usable space for us.
    • This also means our clothes might be longer so I might need to adjust the height of the bars.
  • Storage Space Is Mandatory: For women, a lot of things we own are not always seasonal. I have purses, shoes, scarves, and jewelry that I use year round. So I need to think of a way to store these things that don't take a lot of space.
  • If It Looks Pretty Than I want It To Stay Pretty: This concept applies to all of us. When a space looks nice and is inviting, we tend to want to keep it that way rather than ignoring it. If I can design something where I might be able to add some decorative wall/contact paper to make the closet be an extension of our room, it will help me want to keep things organized.
Okay, I am off to see how I might be able to pull this project together before Spring gets here!

Thursday, February 7, 2013

"Grateful" Craft Frame


I have run out of end table space! And mantel space. My front buffet is pretty crammed too. I am serious! That is why I did a wall piece for our November craft group. Wall space is easier to come by at my house, and I was hoping anyone who signed up had the same issue.
This project had its fair share of obstacles. I had already posted "concept" pictures in the FB group and-because my dad had been in the hospital- inspiration had not been flowing.

I spent hours designing the first set of tags, and I was sooo not happy with them, but I was running out of time. I felt like I was settling. I can't explain what happened, but about 2 days before all the sign ups were due, something (or someone) became my muse. I was at the hospital with my dad when it all came to me.

I realized the problem was I was trying to design something for other people vs. what I would want in my home! So I came up with a neutral backdrop and added color that I wanted, realizing that I could exchange my accent color with a color anyone else would want.
Stock photo of baseboard moulding

I began this project with some baseboard moulding. My frame measures 18"x22" from outside edge to outside edge. So I measured 2 pieces at 18" and 2 pieces at 22". I then cut them with a compound mitre saw at a 45 degree angle. Then I used some clamps to first wood glue the angles, and then secured them with a brad nailer. Then I stretched the wire across the back of the frame and glued with a puddle of hot glue. Since the moulding itself was thin, I did not have any type of fastener that wouldn't go all the way through. I am sure there is some out there, I just didn't want to go buy anything so I was willing to sit there and hold the wire while the glue cooled. :) I took a pair of needle nose pliers and made a twisty type loop to give the glue something to hold on to. How you space your wire depends on how big your tags are.

I would love to have this post be a tutorial. But, it cannot. This is one of those personal projects, in which you have to decide what you want on your frame. But I will tell you a little bit of what I did in case you have an itch to make one yourself.


I used 2 1/2 inch chipboard letters and covered them with teal paper. They spell the word F-A-M-I-L-Y. I also inked the edges for that distressed look. I used a broken necklace to create the chain embellishment, and added the 2 beads at the end of the chain. I also put a heart and a key charm together to hang on the wire on the left side of the photo.


I love details. Embellishments are details. Texture and shape are details. So you can see that on the rosette tag, I could have just left the ribbon rosette alone but I put a rhinestone pin through it. I reminds me of those vintage hat pins.I formed the hanger out of wire. Don't be afraid to try and fail. I learn my most valuable lessons in crafting when I mess up. I hung the pennant flags from the hanger and added the butterfly and those teensy pearls for his body. I added the same pearls to the clothespin for detail.


I added a vintage copper brad to the pinwheel, and used modge podge to put glitter on a few of the clothes pins. I used my Silhouette to cut out some tags to write things I am thankful for. I did not glue them in case I want to change anything later. On the large and small clothespins I used embossing powder to add color rather than modge podging all of the clothespins with coordinating paper.

I hope this inspires you to create your own work of art. If it does, leave a comment and a link as I would love to see it!

Wednesday, February 6, 2013

The Dreaded Archway

4 years! That's right, FOUR YEARS is how long I have lived in this house. It has never taken so long to make a house my home in my entire home-owning career! What is wrong with me? I will be honest...I am having a really hard time with all forms of inspiration. I am Google-ing and Pinterest-ing and I cannot seem to have any creative streak being sparked! Thus, this post...


I have a sort of "archway" in my kitchen. It connects two different living spaces, the Kitchen (blue)and the Living Room (yellow). How, may I ask, does one blend this 5 foot space aesthetically? I DON'T KNOW EITHER! This was my first attempt at... something. I did these stripes and then rubbed over the top with a brown paint to "antique" it. My style is definitely more Vintage French Country. And I thought this might work. NOPE!! I hated it the minute it got done. But, because of the amount of time it took, my husband said I couldn't paint over it until  I had lived with it for 10 weeks. Ha! 10 weeks came and went and I still hated it. So right now, it just has primer over it until I can figure out what I want.

I love stripes. Adore them! Long before stripes were popular, I was painting stripes. Being this archway/alcove space is small and can be dark, I have a few things to keep in mind if anything I plan will work.

  • Lighting- It cannot be so dark with color that it sucks the light out of the "room".
  • Floor- I hate my floor. Have I said before it is the worst decision I have ever made! It is way to dark for my east facing house so again, another light issue.
  • Traffic- it is a busy space. It leads to the Laundry Room, Garage, and Master Bedroom (I know! What were they thinking when they designed this house??) I have to have washable paint and colors that keep the eye away from the grime.
I am repainting my kitchen to a lighter color of blue, as light as it is, it is still too dark for my east facing house. And then I am going to repaint my living room to a light color of beige. I have to, because the yellow on the wall ended up having something wrong with it and discolored at the top by the ceiling? Yeah, dunno what happened, but it did. I am thinking of mixing the 2 NEW colors into the archway.

So, in scouring the internet and Pinterest, I have only found a few things I would consider doing:


I like the different sizes of stripes...
...then overlaying vinyl or a stencil.


I like the concept of using horizontal stripes, but not these "even Steven" stripes you see everywhere. So, what if I paint the base color the cream from the Living Room...Then use the new blue I will be putting in the kitchen to make uneven horizontal stripes? Yes, the space would be predominantly blue, but the kitchen table does sit in front of this archway. (But I am not even going to get int to how I will change the LR/Kitchen space when our downstairs is complete and how this paint setup will be very practical...) IF I add a stencil/vinyl overlay, I would put it on one side to keep it asymmetrical. What do you think? Can you visualize? As soon as I kick this flu bug, I will get started and update what it all looks like.
Photobucket